Setting up a development environment for Rust for Linux
February 22, 2025 · 10 min read
建议 Tips
您正在查看印刷版本的博客, 印刷版本的博客可能会缺少部分交互功能, 部分内容显示不全或过时. 如果您在查看该印刷版博客时遇到了任何问题, 欢迎来此链接查看在线版: https://www.kxxt.dev/blog/rust-for-linux-dev-setup/
You are viewing a printed version of this blog. It may lack some interactive features and some content might now be fully displayed or outdated. If you encounter any problems while viewing this printed version of the blog, feel free to view the online version here: https://www.kxxt.dev/blog/rust-for-linux-dev-setup/
This blog post focuses on setting up a Rust for Linux
development environment that aims for ⚡ blazingly ⚡ fast iteration.
Prerequisite
- Linux dev machine preferably on x86_64 architecture.
- Enable virtualization options needed for KVM in UEFI/BIOS Setup (Optional, for better performance)
- Install dependencies for building kernel, which varies from distribution to distribution.
- Install a recent Rust compiler, bindgen, LLVM and Clang. (At the time of writing, gccrs is still experimental)
- Install QEMU system emulator
Getting the Source
The first step is cloning the git repository.
Linux kernel adopts a distributed development model where there are many subsystems, and each subsystem usually keeps a git repository, which is used to submit pull requests to Linus. And Linus will merge them into mainline.
So there’s usually a need to work with multiple git repositories from different subsystems. Here we will manage them using git remotes, keeping a single git repository locally.
Later we will create worktrees and rootfs so we need to choose a workspace directory first,
here I will use ~/Workspaces/kernel.
export WORKSPACE=$HOME/Workspaces/kernelmkdir -p -- "$WORKSPACE" && cd $_
First, let us clone the mainline tree:
git clone git://git.kernel.org/pub/scm/linux/kernel/git/torvalds/linux.git
And then add the Rust for Linux tree to it and fetch from it:
cd linuxgit remote add rust https://github.com/Rust-for-Linux/linux.gitgit fetch rust
We can see a few rusty branches from this remote become available:
remote: Enumerating objects: 10187, done.remote: Counting objects: 100% (2685/2685), done.remote: Total 10187 (delta 2685), reused 2685 (delta 2685), pack-reused 7502 (from 1)Receiving objects: 100% (10187/10187), 9.76 MiB | 3.69 MiB/s, done.Resolving deltas: 100% (6657/6657), completed with 876 local objects.From https://github.com/Rust-for-Linux/linux * [new branch] for-rust-upstream-ci -> rust/for-rust-upstream-ci * [new branch] rust -> rust/rust * [new branch] rust-block-next -> rust/rust-block-next * [new branch] rust-dev -> rust/rust-dev * [new branch] rust-fixes -> rust/rust-fixes * [new branch] rust-next -> rust/rust-next
But before rushing to checkout rust-next branch and configure and build the kernel,
let’s create a git worktree.
Info
A git worktree is a separate working tree attached to the same git repository.
During development, it is often handy to be able to work on multiple branches/topics concurrently.
For instance, working on rusty feature A on a branch based on rust-next and working on bug fixes
in other subsystems based on a different git branch.
By using git worktree, we can avoid other suboptimal solutions like:
- (anti-pattern) Copy the entire git repository to work on another branch concurrently.
This obviously occupies much more disk space and will require running
git fetchin both repos in the future. - Just checking out another branch when switching tasks, which is very tedious and will often trigger rebuild of all the codes.
We will place the worktrees under $WORKSPACE/trees and name the branch(and the worktree) rust-quick-start:
mkdir -p -- "$WORKSPACE/trees"git worktree add -b rust-quick-start "$WORKSPACE/trees/rust-quick-start" rust/rust-nextcd ../trees/rust-quick-start
Configure the Kernel
Manually configuring the kernel in menuconfig is tedious. So I have created a relatively minimal kernel config which you can download here.
This .config enables a minimal set of options, like
- Loadable Kernel Module
- Rust
- eBPF
- root on NFS and networking during early boot
- Things needed to run systemd
- Virtio GPU, PS2 Keyboard and Mouse, etc to run a desktop environment
All you need to do is to download the config file to the root of your worktree and name it .config.
Then we update the .config file via make LLVM=1 olddefconfig,
which will set new options to their default values.
Build the Kernel
Caution
At the time of writing, there’s a bug in the kernel that will cause build errors under this .config.
Specifically, x86 builds with both CONFIG_GENDWARFKSYMS and CONFIG_FUNCTION_TRACER enabled will result in
an error complaining about missing prototype for get_kernel_nofault().
So I picked the fix from mailing lists into my branch:
curl https://lore.kernel.org/all/173881156244.211648.1242168038709680511.stgit@devnote2/raw | git am
Future readers might not need to do this once the fix is present in Rust for Linux’s tree.
Let’s first check rust is available:
$ make LLVM=1 rustavailable Rust is available!
Cool! Time for a build:
make LLVM=1 -j$(nproc)
And after waiting, the kernel is built:
OBJCOPY arch/x86/boot/vmlinux.bin AS arch/x86/boot/header.o LD arch/x86/boot/setup.elf OBJCOPY arch/x86/boot/setup.bin BUILD arch/x86/boot/bzImageKernel: arch/x86/boot/bzImage is ready (#1)
Now let’s build a rootfs to boot.
Build a rootfs
We will boot a full Linux distribution with our built kernel. In this blog post, I will create an Arch Linux rootfs but it is also possible to use other distributions if you want to tweak the commands. (I use Arch, BTW 😄)
First create a directory for storing rootfs and cd into it:
mkdir -p -- "$WORKSPACE/rootfs" && cd $_
Then bootstrap a base Arch Linux chroot:
sudo mkdir archsudo pacstrap arch base systemd-sysvcompat vim busybox
And setting up some basic stuff:
sudo ln -sf $(realpath /etc/localtime) arch/etc/localtimeecho devbox | sudo tee arch/etc/hostnamesudo passwd -R $(realpath arch)
Now we have an Arch Linux rootfs on our host, which is very handy for us to transfer files between host and guest. But how could we use it as rootfs in emulator?
The simple answer is NFS.
(Well, there are other options like 9pfs, but personally I get a lot of quirks when using it)
To make the rootfs available over NFS, we need to install nfs server on host and enable it:
sudo systemctl start nfs-server.service
Then add our workspace folder to /etc/exports:
echo "$WORKSPACE 127.0.0.1(rw,sync,no_subtree_check,no_root_squash,insecure)" | sudo tee -a /etc/exports
Here I choose to expose not only the rootfs but the entire workspace over NFS because I find it easier this way to run kselftests in guest.
And export it:
sudo exportfs -av
Write a Minimal Init
Wait. Shouldn’t we use Systemd for init?
Sure, but most of the time we do not need it and a simple init could dramatically speed up things.
Let us save the following script to arch/init2 and give it executable permission.
This init script simply mounts the filesystems, configures the network, setting printk level and drops you into a shell.
Note
Those magic IP addresses come from QEMU User Networking.
The performance of QEMU User Networking is poor but nonetheless should be enough for doing kernel hacking.
Boot!
cd -- "$WORKSPACE/trees/rust-quick-start"sudo qemu-system-x86_64 \ -kernel arch/x86/boot/bzImage -M pc \ -m 4G -smp 4 \ -vga none -nographic \ -no-reboot \ -accel kvm \ -netdev user,id=n1,hostfwd=tcp::8022-:22 -device e1000,netdev=n1 \ -append "root=/dev/nfs rw nfsroot=10.0.2.2:$WORKSPACE/rootfs/arch ip=10.0.2.15:10.0.2.2:10.0.2.2:255.255.255.0 console=ttyS0 init=/init2"
If everything works as intended, you should now booted into a bash shell of the guest.
Didn’t We Forget Modules?
Yes. we forgot to install the modules into the rootfs. Let’s do it now:
First we will create /lib/modules in rootfs and chown that directory so that
we do not need to install modules as root. (Don’t do that in production 😂)
sudo mkdir -p -- "$WORKSPACE/rootfs/arch/lib/modules"sudo chown "$USER:$USER" -- $_
Then we can install modules:
make LLVM=1 INSTALL_MOD_PATH="$WORKSPACE/rootfs/arch" modules_install
Graphics and Systemd
Here I will install xfce4 as the desktop environment, which is super light-weight.
# In guestpacman -S xfce4 lightdm{,-gtk-greeter}
Then we need to tweak our qemu command line to add a display:
sudo qemu-system-x86_64 \ -kernel arch/x86/boot/bzImage -M pc \ -m 4G -smp 4 \ -vga virtio \ -display default \ -no-reboot \ -accel kvm \ -device qemu-xhci \ -netdev user,id=n1,hostfwd=tcp::8022-:22 -device e1000,netdev=n1 \ -append "root=/dev/nfs rw nfsroot=10.0.2.2:$WORKSPACE/rootfs/arch ip=10.0.2.15:10.0.2.2:10.0.2.2:255.255.255.0 console=ttyS0"
A qemu window should pop up. After login, getting into the desktop environment is as easy as one line:
systemctl start lightdm
There are some quirks about the mouse in QEMU, I haven’t figured out why.
Write Some Rust Code
I didn’t know if Rust for Linux is capable enough to be used to rewrite core kernel code so I am going to try crazy stuff like that now.
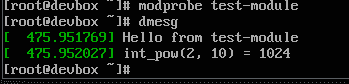
Let’s try to rewrite the very simple int_pow.c and load a module to test it out:
diff --git a/lib/math/int_pow.c b/lib/math/int_pow.cdeleted file mode 100644index 0cf426e69bda..000000000000--- a/lib/math/int_pow.c+++ /dev/null@@ -1,32 +0,0 @@-// SPDX-License-Identifier: GPL-2.0-/*- * An integer based power function- *- * Derived from drivers/video/backlight/pwm_bl.c- */--#include <linux/export.h>-#include <linux/math.h>-#include <linux/types.h>--/**- * int_pow - computes the exponentiation of the given base and exponent- * @base: base which will be raised to the given power- * @exp: power to be raised to- *- * Computes: pow(base, exp), i.e. @base raised to the @exp power- */-u64 int_pow(u64 base, unsigned int exp)-{- u64 result = 1;-- while (exp) {- if (exp & 1)- result *= base;- exp >>= 1;- base *= base;- }-- return result;-}-EXPORT_SYMBOL_GPL(int_pow);diff --git a/lib/math/int_pow.rs b/lib/math/int_pow.rsnew file mode 100644index 000000000000..3277e781e497--- /dev/null+++ b/lib/math/int_pow.rs@@ -0,0 +1,11 @@+///! int_pow, now in a rust crate++/// int_pow - computes the exponentiation of the given base and exponent+/// @base: base which will be raised to the given power+/// @exp: power to be raised to+///+/// Computes: pow(base, exp), i.e. @base raised to the @exp power+#[no_mangle]+pub extern "C" fn int_pow(base: u64, exp: u32) -> u64 {+ base.pow(exp)+}diff --git a/rust/exports.c b/rust/exports.cindex 587f0e776aba..67a4649e448c 100644--- a/rust/exports.c+++ b/rust/exports.c@@ -24,3 +24,5 @@ #ifdef CONFIG_RUST_BUILD_ASSERT_ALLOW EXPORT_SYMBOL_RUST_GPL(rust_build_error); #endif++EXPORT_SYMBOL_RUST_GPL(int_pow);diff --git a/test-module/Makefile b/test-module/Makefilenew file mode 100644index 000000000000..aec620066fb4--- /dev/null+++ b/test-module/Makefile@@ -0,0 +1 @@+obj-m += test-module.odiff --git a/test-module/test-module.c b/test-module/test-module.cnew file mode 100644index 000000000000..2f9764aa972a--- /dev/null+++ b/test-module/test-module.c@@ -0,0 +1,18 @@+#include <linux/module.h>+#include <linux/printk.h>+#include <linux/math.h> ++static int __init init_test_module(void) {+ pr_info("Hello from test-module\n");+ pr_info("int_pow(2, 10) = %llu\n", int_pow(2, 10));+ return 0; +} ++static void __exit exit_test_module(void) { + pr_info("Goodbye from test-module\n"); +}++module_init(init_test_module);+module_exit(exit_test_module);++MODULE_LICENSE("GPL");
make LLVM=1 -j$(nproc)make LLVM=1 M=test-module/ modulesmake LLVM=1 M=test-module/ INSTALL_MOD_PATH="$WORKSPACE/rootfs/arch" modules_install
Wow, to my surprise, it works!
In practice, though, you should probably try other stuff like writing a driver in rust. Rewriting core kernel things in rust are unlikely to be accepted at the time of writing:/
Recap: Inner Dev Loop
To summarize, the inner dev loop is
- Build kernel (and install modules)
make LLVM=1 -j$(nproc)make LLVM=1 INSTALL_MOD_PATH="$WORKSPACE/rootfs/arch" modules_install
- Test the changes in QEMU
This blog post uses
- git worktree for efficient topic/branch management
- QEMU instead of real hardware
- root on NFS so that transfering files between host and guest are very handy
- two
inits tailored for different development tasks - full linux distribution as rootfs so that it is simple to test anything as easy as on host
to achieve faster inner dev loop.